I'm pretty sure we've all seen these ornament wreaths (example post
here, but also seen on Martha Stewart and BH&G, and who knows, everywhere else!). So knowing that I wanted to make one of these guys, I actually bought two boxes of ornaments on clearance last year (hooray Target after Christmas sale!) and yes, have lugged them all over the country. Good thing they were $4 for a box of 41 (I got two) and totally worth that extra 3 pounds of stuff!
I also heard of a little secret that instead of paying $5 for a foam ring (I know, $5 is $5.. but when you're on a budget, you're on a budget), you can go to your local hardware store (Lowe's is less than a mile from me) and get pipe insulation foam for as cheap as 97 CENTS. Win? I think so! So that's what I did on my way home from work last night, as all of a sudden, I was set on making this wreath so I could hang it as soon as Thanksgiving was over! So here's mine, with a few technical difficulties thrown in - enjoy! Show me your wreath too, I love seeing all the different ones people come up with!
Supplies
1 foam wreath (insulation or otherwise)
Different-size ornaments (I used about 80 in total)
Hot glue
Ribbon (if desired)
 |
| Thinnest piece of foam is 97 cents. |
 |
| Duct tape it together, and voila! Cheap-o wreath that still serves the same purpose! |
Insulation? Cheap foam wreath? Yes please! Then start by laying out your ornaments. I didn't realize I had two sizes of ornaments - larger ones (maybe 4" in diameter) and medium ones (probably 3" in diameter). After some online research and chatting with Kim, realized that I would need some much smaller ones to fit in the gaps and awkward holes inbetween these larger ones! Off to Dollar Tree (only gold which clearly doesn't fit my color scheme) and then Walmart (success!) for some late-night ornament hunting.
 |
| Aren't they fun colors?! |
|
|
|
Once you've finally got your ornament collection in place, lay the larger ones in an even pattern around the ring. These will form as the base and will pretty much be the only ones that you actually glue to the base, so make them steady!
After you've done the largest, you can start arranging all your medium/middle-sized ones around them. Most of my medium ones were glued to the large ones, and to each other, though a few to the ring itself.
Use the medium ones to fill in the large open spaces on the wreath, so you can cover the majority of the visible foam.
 |
| Small silver ornaments to the rescue! |
|
|
And, finally, when the middle-sized ones have filled in the majority of the open space, you can add all the little ones to fill in the open gaps and holes in the pattern.
 |
| Pre-silver ornaments. |
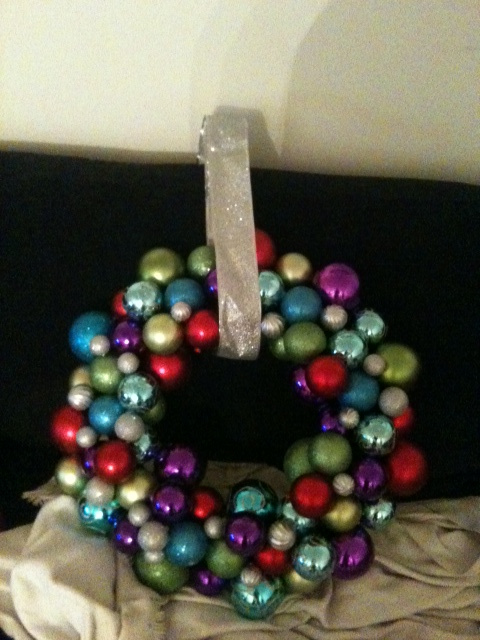
After the little ones! Doesn't it look so much better? And of course, I got ribbon to match the silver. But I figure given that it's almost Christmastime, when
won't I want fun, silver glittery ribbon?
I'm thinking of adding a fun ribbon bow on the bottom, but I'll let you know later. I think this would also be super pretty with all white and light blue ornaments with snowflakes or something for a very wintery wreath. What do you think?
In total, this pretty little thing cost me:
$8 (for 82 ornaments; Target Christmas clearance)
$0.97 (insulation)
$3 (small ornaments)
$4.50 (glitter ribbon that I
know I'll use all over the place)
A whole $16! Victory!


No comments:
Post a Comment